Social Plugins

Best Platform for Online Earning: YouTube vs. Facebook vs. Instagram

Best Platform for Online Earning: You Tube vs. Facebook vs. Insta gram Introduction T he digital age has revolutionized how people earn mo...

Saturday, July 20, 2024

Learn how to fix a not indexed blog page in Google search and increase your ranking with this step-by-step guide.

How to Fix a Not Indexed Blog Page in Google Search and Increase Ranking

Introduction

Getting your blog page indexed by Google is crucial for its visibility in search results. Without indexing, your content remains hidden, and all your hard work goes unnoticed. This guide will provide a comprehensive step-by-step process to fix a not indexed blog page, improve your site's ranking, and ensure your content reaches a wider audience.

Understanding Google Indexing

What is Google Indexing?

Google indexing refers to the process where Google bots crawl your web pages and add them to Google's search index. This index is like a vast library, and when users perform a search, Google pulls information from this index to provide relevant results.

Why is Indexing Important?

Indexing is essential because:

  • Visibility: Indexed pages can appear in Google search results, increasing your blog's visibility.
  • Traffic: More visibility leads to higher traffic.
  • Credibility: Indexed pages add credibility to your blog, as they are recognized by Google.

Common Reasons for Not Getting Indexed

Before diving into solutions, let's understand why a blog page might not be indexed:

  • Noindex Tag: A noindex tag in your meta tags instructs Google not to index the page.
  • Robots.txt File: This file might block Google bots from crawling your page.
  • Crawl Errors: Issues like server errors or broken links can prevent indexing.
  • Duplicate Content: Google may not index pages with duplicate content.
  • Low-Quality Content: Poor quality or thin content might not be indexed.

Step-by-Step Guide to Fix Not Indexed Blog Page

1. Verify Google Search Console

Why Use Google Search Console?

Google Search Console (GSC) is a free tool that provides insights into your site's performance and indexing status. It helps you identify and fix indexing issues.

Steps to Verify and Use GSC:

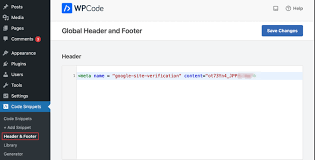
  1. Add Your Site: Go to Google Search Console and add your website.
  2. Verify Ownership: Follow the verification process (HTML tag, Google Analytics, or DNS record).
  3. Inspect URL: Use the URL Inspection tool to check if your page is indexed. If not, GSC will provide details on why it isn't.

2. Check and Remove Noindex Tags

What is a Noindex Tag?

A noindex tag in your HTML meta tags tells search engines not to index the page.

How to Check and Remove:

  1. View Page Source: Right-click on your page and select "View Page Source."
  2. Search for Noindex: Use Ctrl+F (Cmd+F on Mac) and search for "noindex."
  3. Remove Tag: If found, remove the <meta name="robots" content="noindex"> tag from your HTML.

3. Review Robots.txt File

What is Robots.txt?

The robots.txt file instructs search engine bots on which pages to crawl and which to avoid.

How to Check and Update Robots.txt:

  1. Access Robots.txt: Go to yourdomain.com/robots.txt.
  2. Look for Disallow: Check for any "Disallow" directives blocking Google bots.
  3. Update File: Remove or adjust any directives that block important pages.

4. Fix Crawl Errors

Identifying Crawl Errors

Crawl errors can occur due to server issues, broken links, or other technical problems.

Steps to Fix Crawl Errors:

  1. Use GSC: In Google Search Console, go to the Coverage report.
  2. Identify Errors: Look for errors such as "404 not found" or "500 server error."
  3. Fix Errors: Resolve these errors by updating links, fixing server issues, or redirecting broken URLs.

5. Avoid Duplicate Content

Why Avoid Duplicate Content?

Duplicate content confuses search engines and can lead to indexing issues.

How to Avoid:

  1. Use Canonical Tags: Implement canonical tags to indicate the preferred version of a page.
  2. Create Unique Content: Ensure each page has unique and valuable content.
  3. Check for Plagiarism: Use tools like Copyscape to check for and remove any duplicated content.

6. Improve Content Quality

Importance of Quality Content

High-quality content is more likely to be indexed and ranked higher by Google.

Tips for Improving Content:

  1. In-depth Articles: Write comprehensive, well-researched articles.
  2. Use Visuals: Include images, videos, and infographics to enhance the content.
  3. Engaging Format: Use headings, bullet points, and short paragraphs for better readability.

7. Submit Sitemap to Google

What is a Sitemap?

A sitemap is a file that lists all the URLs on your site, helping search engines crawl your site more effectively.

Steps to Submit a Sitemap:

  1. Create Sitemap: Use tools like Yoast SEO (for WordPress) or Screaming Frog to create a sitemap.
  2. Submit in GSC: In Google Search Console, go to "Sitemaps" and submit your sitemap URL.

8. Build Quality Backlinks

Why Backlinks Matter?

Backlinks from reputable sites signal to Google that your content is valuable and trustworthy.

How to Build Backlinks:

  1. Guest Posting: Write guest posts for reputable blogs in your niche.
  2. Reach Out: Contact influencers or bloggers to share your content.
  3. Create Shareable Content: Produce high-quality content that naturally attracts backlinks.

9. Ensure Mobile-Friendliness

Importance of Mobile-Friendly Design

Google prioritizes mobile-friendly websites in its indexing and ranking.

How to Ensure Mobile-Friendliness:

  1. Responsive Design: Use a responsive design that adjusts to different screen sizes.
  2. Mobile Testing: Use Google’s Mobile-Friendly Test to check your site’s mobile compatibility.
  3. Optimize Loading Speed: Ensure fast loading times on mobile devices.

10. Monitor and Update Regularly

Importance of Regular Monitoring

Regular monitoring helps you catch and fix issues before they affect your indexing and ranking.

Tools for Monitoring:

  1. Google Analytics: Track your site’s performance and user behavior.
  2. Google Search Console: Regularly check for indexing issues and errors.
  3. SEO Tools: Use tools like Ahrefs, SEMrush, or Moz for comprehensive site audits.

Benefits of Fixing Indexing Issues

Increased Visibility

By fixing indexing issues, your pages become visible in Google search results, leading to increased traffic.

Better Ranking

A properly indexed page with quality content and backlinks can rank higher, attracting more visitors.

Enhanced Credibility

Indexed and high-ranking pages establish your blog as a credible source of information.

Harms of Not Fixing Indexing Issues

Loss of Traffic

Without indexing, your pages remain invisible to potential readers, leading to a significant loss of traffic.

Lower Rankings

Indexing issues can prevent your site from ranking well, reducing its visibility and authority.

Decreased Credibility

A blog with indexing issues may be perceived as less reliable or trustworthy.

Conclusion

Ensuring your blog page is indexed by Google is crucial for its visibility and success. By following the steps outlined in this guide, you can identify and fix indexing issues, improve your site's ranking, and attract a wider audience. Regular monitoring and updating are essential to maintaining a well-indexed and high-ranking blog. Implement these strategies, and you'll see a significant improvement in your blog's performance.


Monday, July 15, 2024

Internal Linking in Blogger: A Comprehensive Guide to Boost Your SEO and Rankings - ब्लॉगर में आंतरिक लिंकिंग: आपकी SEO और रैंकिंग को बढ़ाने के लिए एक व्यापक गाइड

Internal Linking in Blogger: A Comprehensive Guide to Boost Your SEO and Rankings

Introduction

Internal linking is a crucial aspect of SEO that helps improve the visibility and ranking of your blog. By strategically placing links within your blog posts, you can guide readers to other relevant content on your site, which not only enhances user experience but also signals to search engines the structure and importance of your content. This blog will provide a comprehensive guide on how to implement internal linking in Blogger, including the benefits, potential pitfalls, and best practices to maximize your SEO efforts.


What is Internal Linking?

Internal linking refers to the practice of linking one page of your website to another page within the same domain. These links are essential for three main reasons:

  1. Navigation: They help users navigate through your website, finding relevant content easily.
  2. Information Hierarchy: They establish an information hierarchy, showing which pages are more important.
  3. Link Equity Distribution: They distribute link equity (ranking power) across your website, helping important pages rank higher.

Benefits of Internal Linking

Improved User Experience

  1. Enhanced Navigation: Internal links guide users to related content, making it easier for them to find information.
  2. Increased Engagement: By providing links to related posts, you keep readers on your site longer, reducing bounce rates and increasing session duration.

SEO Advantages

  1. Crawling and Indexing: Internal links help search engines crawl and index your site more efficiently, ensuring all your content is discovered.
  2. Keyword Optimization: By using keyword-rich anchor texts, you can improve the relevance of your linked pages.
  3. Distribution of Page Authority: Internal links pass authority from one page to another, helping important pages rank better.

Potential Pitfalls of Internal Linking

  1. Over-Optimization: Excessive internal linking can lead to penalties. Avoid keyword stuffing and ensure links are relevant and useful.
  2. Broken Links: Regularly check for broken links as they can harm user experience and SEO.
  3. Irrelevant Links: Ensure your internal links are relevant and add value to the reader. Irrelevant links can confuse users and dilute your SEO efforts.

Step-by-Step Guide to Internal Linking in Blogger

Step 1: Identify Key Pages

Identify the most important pages on your blog that you want to rank higher. These could be cornerstone content, pillar posts, or pages that generate the most traffic and conversions.

Step 2: Create Relevant Content

Create high-quality, relevant content that can be linked to your key pages. Ensure your content is informative, engaging, and provides value to your readers.

Step 3: Use Keyword-Rich Anchor Texts

Anchor text is the clickable text in a hyperlink. Use keyword-rich anchor texts that are relevant to the linked page. Avoid using generic phrases like "click here" and instead, use descriptive keywords that give context to the link.

Step 4: Add Internal Links

  1. Within the Content: Place internal links naturally within the content of your blog posts. Ensure they are relevant and add value to the reader.
  2. In the Sidebar: Use your blog’s sidebar to link to key pages or related posts. Widgets like “Popular Posts” or “Related Posts” can be useful.
  3. In the Footer: Add links to important pages in the footer of your blog. This can include links to categories, tags, or popular posts.

Step 5: Maintain a Logical Structure

Ensure your internal links follow a logical structure. Use a hierarchical structure where top-level pages link to sub-pages. This helps search engines understand the importance and relationship between pages.

Step 6: Use a Reasonable Number of Links

While internal linking is beneficial, avoid overdoing it. A reasonable number of internal links per page (around 2-5) is usually sufficient. Focus on quality over quantity.

Step 7: Regularly Update and Audit Links

Regularly check your internal links to ensure they are not broken and are still relevant. Use tools like Google Search Console to identify broken links and fix them promptly.

Tools to Help with Internal Linking

  1. Google Search Console: Use Google Search Console to identify broken links and analyze your internal link structure.
  2. Ahrefs: Ahrefs can help you analyze your internal linking strategy and identify opportunities for improvement.
  3. Screaming Frog: This tool can crawl your website and provide insights into your internal linking structure, highlighting broken links and other issues.

Best Practices for Internal Linking

  1. Link to Relevant Content: Ensure your internal links are relevant and provide additional value to the reader.
  2. Use Descriptive Anchor Texts: Use descriptive, keyword-rich anchor texts that give context to the linked page.
  3. Avoid Excessive Links: Too many internal links can be overwhelming and may be seen as spammy by search engines.
  4. Link to Deep Pages: Don’t just link to your homepage or top-level pages. Link to deep pages within your site to help them rank better.
  5. Maintain a Consistent Structure: Use a consistent and logical structure for your internal links to help search engines and users navigate your site effectively.

Conclusion

Internal linking is a powerful SEO strategy that can significantly improve your blog's visibility, user experience, and rankings. By following the steps and best practices outlined in this guide, you can create an effective internal linking strategy that enhances your SEO efforts and drives more traffic to your blog. Regularly audit your links to ensure they remain relevant and functional, and always prioritize the user experience in your linking strategy.

Implementing internal linking effectively can be a game-changer for your blog’s SEO, helping you achieve better rankings and increased engagement. Start leveraging the power of internal linking today to unlock your blog’s full potential.

Additional Tips for Effective Internal Linking

  1. Utilize Categories and Tags: Organize your content into categories and tags. This not only helps with site navigation but also makes it easier to create relevant internal links.
  2. Use a Table of Contents: For long-form content, include a table of contents with internal links to different sections. This improves user experience and helps with on-page SEO.
  3. Leverage Older Posts: Don’t forget to link back to older posts. This can revive old content and distribute link equity effectively.
  4. Regularly Publish Quality Content: Continuously publish high-quality, relevant content. This provides more opportunities for internal linking and keeps your audience engaged.

Common Mistakes to Avoid

  1. Ignoring Anchor Texts: Using generic anchor texts like “click here” doesn’t provide context to search engines. Use descriptive, keyword-rich anchor texts instead.
  2. Overusing Exact Match Keywords: While it’s important to use keywords in anchor texts, avoid overusing exact match keywords as it can be seen as manipulative by search engines.
  3. Neglecting Mobile Users: Ensure your internal links are easily accessible on mobile devices. A significant portion of your audience may be accessing your site from mobile devices, and a poor mobile experience can hurt your rankings.
  4. Not Monitoring Performance: Regularly monitor the performance of your internal links. Use tools like Google Analytics to track user behavior and make adjustments as needed.

By understanding and implementing the principles of internal linking, you can enhance your blog’s SEO, improve user experience, and ultimately achieve higher rankings in search engine results. Keep refining your strategy, stay updated with SEO best practices, and your efforts will pay off in the long run.

Friday, June 28, 2024

How to Index Your Blog Site and Increase Ranking: A Comprehensive Guide : अपनी ब्लॉग साइट को इंडेक्स कैसे करें और रैंकिंग कैसे बढ़ाएँ

How to Index Your Blog Site and Increase Ranking: A Comprehensive Guide

Introduction

In the digital age, having an online presence is crucial for individuals and businesses alike. A blog can be a powerful tool for sharing information, building a brand, and generating income. However, for your blog to be effective, it needs to be easily discoverable by search engines like Google. This guide will walk you through the process of indexing your blog site and increasing its ranking, along with an in-depth look at the benefits and potential drawbacks.

What is Indexing?

Indexing is the process by which search engines like Google, Bing, and Yahoo! crawl, analyze, and store information about web pages. When your blog is indexed, it becomes part of a search engine's database, allowing it to appear in search results.

How to Get Your Blog Indexed

  1. Submit Your Sitemap to Search Engines

    • Create a Sitemap: A sitemap is a file that lists all the pages on your site, helping search engines understand your site's structure. You can create a sitemap using tools like Yoast SEO (for WordPress) or online sitemap generators.
    • Submit to Google Search Console: Sign up for Google Search Console, add your site, and submit your sitemap. This tells Google to crawl your site.
    • Submit to Bing Webmaster Tools: Similar to Google Search Console, Bing Webmaster Tools allows you to submit your sitemap and track your site's performance.
  2. Ensure Your Site is Crawlable

    • Check Robots.txt: This file tells search engines which pages to crawl and which to ignore. Ensure your robots.txt file is not blocking important pages.
    • Use Internal Linking: Linking between your blog posts helps search engines find and index new content.
  3. Create High-Quality Content

    • Original and Relevant Content: Write blog posts that are original, informative, and relevant to your audience.
    • Regular Updates: Update your blog regularly to keep search engines coming back to index new content.
  4. Optimize On-Page SEO

    • Use Keywords Strategically: Research and use relevant keywords in your titles, headers, and throughout your content. Tools like Google Keyword Planner can help.
    • Optimize Meta Tags: Include your primary keyword in the meta title and description.
    • Alt Text for Images: Use descriptive alt text for images to help search engines understand the content.
  5. Build Backlinks

    • Guest Blogging: Write articles for other reputable blogs in your niche to gain backlinks.
    • Social Media Promotion: Share your blog posts on social media platforms to drive traffic and build links.
    • Engage in Online Communities: Participate in forums and online communities related to your niche, sharing links to your content where relevant.

How to Increase Your Blog's Ranking

  1. Focus on User Experience (UX)

    • Responsive Design: Ensure your blog is mobile-friendly.
    • Fast Loading Times: Use tools like Google PageSpeed Insights to improve your site's loading speed.
    • Easy Navigation: Make it easy for users to navigate your site with a clear menu and internal linking.
  2. Implement Advanced SEO Techniques

    • Schema Markup: Add structured data to your blog to help search engines understand your content better.
    • Rich Snippets: Enhance your search results with rich snippets like star ratings, FAQs, and images.
  3. Analyze and Adapt

    • Use Analytics Tools: Track your performance with tools like Google Analytics and Google Search Console.
    • Monitor Competitors: Keep an eye on your competitors' strategies and adapt your approach accordingly.
  4. Leverage Social Media

    • Engage with Your Audience: Build a community around your blog by engaging with readers on social media.
    • Share Content Regularly: Promote your blog posts on various social platforms to increase visibility and drive traffic.

Benefits of Indexing and Ranking

  1. Increased Visibility

    • Higher rankings lead to increased visibility in search results, driving more organic traffic to your blog.
  2. Enhanced Credibility

    • Appearing on the first page of search results enhances your credibility and authority in your niche.
  3. Higher Engagement

    • Quality traffic from search engines tends to engage more with your content, leading to higher conversion rates.
  4. Monetization Opportunities

    • Increased traffic and credibility can open up monetization opportunities such as affiliate marketing, sponsored posts, and ad revenue.

Potential Drawbacks

  1. Time-Consuming

    • SEO and indexing are long-term strategies that require consistent effort and time.
  2. Algorithm Changes

    • Search engine algorithms frequently change, which can affect your rankings. Staying updated with these changes is crucial.
  3. Competitive Landscape

    • High competition in popular niches can make it challenging to achieve top rankings.
  4. Technical Challenges

    • Ensuring your site is technically optimized for SEO can require expertise and resources.

Conclusion

Indexing your blog site and increasing its ranking are essential steps to boost your online presence. While the process can be time-consuming and challenging, the benefits of increased visibility, credibility, and monetization opportunities make it worthwhile. By following the steps outlined in this guide and staying committed to best SEO practices, you can improve your blog's performance and achieve long-term success.

Tuesday, June 18, 2024

How to Create a Sitemap in Blogger and Increase Ranking: A Comprehensive Step-by-Step Guide : ब्लॉगर में साइटमैप कैसे बनाएं और रैंकिंग कैसे बढ़ाएं: एक व्यापक चरण-दर-चरण मार्गदर्शिका

How to Create a Sitemap in Blogger and Increase Ranking: A Comprehensive Guide

Creating a sitemap for your Blogger site is a crucial step in improving your SEO and making your content easily discoverable by search engines. A sitemap is essentially a blueprint of your website that helps search engines index your pages more effectively. In this guide, we'll take you through the steps to create a sitemap in Blogger and explore the benefits and potential drawbacks, along with SEO strategies to increase your site's ranking.

Table of Contents

  1. Introduction to Sitemaps
  2. Benefits of a Sitemap
  3. How to Create a Sitemap in Blogger
  4. Submitting Your Sitemap to Search Engines
  5. SEO Strategies to Increase Ranking
  6. Potential Drawbacks and How to Mitigate Them
  7. Conclusion

1. Introduction to Sitemaps

A sitemap is a file that provides information about the pages, videos, and other files on your site, and the relationships between them. Search engines like Google read this file to crawl your site more efficiently. For Blogger users, creating a sitemap can be a straightforward process that significantly enhances your site's visibility.

2. Benefits of a Sitemap

Improved Indexing

A sitemap helps search engines find and index all the important pages on your site. This is especially beneficial for new sites or sites with dynamic content.

Enhanced SEO

By making your content more accessible to search engines, a sitemap can improve your site's search engine ranking, resulting in more organic traffic.

Better User Experience

A well-structured sitemap ensures that all your content is organized logically, making it easier for visitors to navigate your site.

Rapid Updates

Whenever you update your site, a sitemap ensures that search engines are quickly informed of the changes, ensuring your new content is indexed promptly.

3. How to Create a Sitemap in Blogger

Creating a sitemap for your Blogger site involves a few simple steps. Here's a step-by-step guide:

Step 1: Generate a Sitemap

Blogger doesn't automatically create a traditional XML sitemap, but you can generate one using an online tool or manually. For simplicity, we'll use the URL structure to generate a sitemap.

  1. Homepage Sitemap:

    • Your main sitemap URL will look like this: http://yourblog.blogspot.com/sitemap.xml.
  2. Post Sitemap:

    • Blogger automatically creates a sitemap for your posts. You can access it by adding atom.xml?redirect=false&start-index=1&max-results=500 to your blog's URL. For example:
      bash
      http://yourblog.blogspot.com/atom.xml?redirect=false&start-index=1&max-results=500

Step 2: Create a Custom Robots.txt File

To ensure that search engines can find your sitemap, you need to create a custom robots.txt file.

  1. Go to your Blogger dashboard.
  2. Navigate to Settings > Crawlers and indexing.
  3. Enable Custom robots.txt.
  4. Add the following lines to your robots.txt file:
    makefile
    User-agent: * Allow: / Sitemap: http://yourblog.blogspot.com/sitemap.xml Sitemap: http://yourblog.blogspot.com/atom.xml?redirect=false&start-index=1&max-results=500

Step 3: Verify Your Sitemap

After creating your sitemap, you should verify it to ensure it works correctly.

  1. Open a web browser and go to the URLs of your sitemaps (e.g., http://yourblog.blogspot.com/sitemap.xml and http://yourblog.blogspot.com/atom.xml?redirect=false&start-index=1&max-results=500).
  2. Ensure that these URLs display your sitemap without any errors.

4. Submitting Your Sitemap to Search Engines

Once you've created and verified your sitemap, the next step is to submit it to search engines.

Submitting to Google Search Console

  1. Sign in to Google Search Console.
  2. Select your website.
  3. In the left-hand menu, click on Sitemaps.
  4. Enter the URL of your sitemap (e.g., http://yourblog.blogspot.com/sitemap.xml).
  5. Click Submit.

Submitting to Bing Webmaster Tools

  1. Sign in to Bing Webmaster Tools.
  2. Select your website.
  3. In the left-hand menu, click on Sitemaps.
  4. Enter the URL of your sitemap.
  5. Click Submit.

5. SEO Strategies to Increase Ranking

Keyword Research

Conduct thorough keyword research to identify the terms your audience is searching for. Use these keywords strategically in your content, titles, and meta descriptions.

Quality Content

Produce high-quality, original content that provides value to your readers. Engaging content is more likely to be shared and linked to, improving your site's authority and ranking.

On-Page SEO

Optimize your on-page elements, including title tags, meta descriptions, headers, and images. Ensure that your content is well-structured and easy to read.

Mobile Optimization

Ensure that your site is mobile-friendly. Google prioritizes mobile-optimized sites in its rankings, so use responsive design and optimize your site for mobile users.

Backlinks

Build high-quality backlinks from reputable sites. Backlinks are a significant ranking factor, as they indicate to search engines that your content is trustworthy and valuable.

Regular Updates

Keep your content fresh by regularly updating your blog. Search engines favor sites that provide up-to-date information.

6. Potential Drawbacks and How to Mitigate Them

Duplicate Content

Creating multiple versions of your sitemap can lead to duplicate content issues. Ensure that your robots.txt file is correctly configured to avoid this problem.

Overloading Search Engines

Submitting too many URLs can overwhelm search engines. Keep your sitemap concise and only include important pages.

Technical Issues

Errors in your sitemap can prevent search engines from indexing your site correctly. Regularly check and update your sitemap to ensure it remains error-free.

7. Conclusion

Creating a sitemap in Blogger is an essential step to improve your site's SEO and ensure your content is easily discover-able by search engines. By following the steps outlined in this guide, you can generate a sitemap, submit it to search engines, and implement SEO strategies to increase your site's ranking. While there are potential drawbacks, these can be mitigated with careful management and regular updates.

Incorporate these practices into your blogging routine to see a significant improvement in your site's visibility and traffic. A well-structured sitemap combined with effective SEO strategies will set your blog on the path to success.

Monday, June 17, 2024

How to Create a Sitemap in WordPress and Increase Ranking: A Step-by-Step Guide : वर्डप्रेस में साइटमैप कैसे बनाएं और रैंकिंग कैसे बढ़ाएं: एक चरण-दर-चरण मार्गदर्शिका

How to Create a Sitemap in WordPress and Increase Ranking: A Step-by-Step Guide


Creating a sitemap is one of the fundamental steps in optimizing your website for search engines. A sitemap acts as a blueprint for your website, helping search engines find, crawl, and index all your content. This blog will guide you through the process of creating a sitemap and explain how it can help improve your website’s ranking. Additionally, we will cover the benefits and potential drawbacks of using sitemaps, including essential SEO keywords.

What is a Sitemap?

A sitemap is a file that provides information about the pages, videos, and other files on your site, as well as the relationships between them. Search engines like Google read this file to crawl your site more efficiently. There are two primary types of sitemaps:


  1. XML Sitemaps: These are designed for search engines. They list your website's URLs and include metadata such as when each URL was last updated, how often the page changes, and its importance relative to other URLs on the site.
  2. HTML Sitemaps: These are designed for users. They provide a clear and straightforward way for visitors to navigate your website.

Why Sitemaps are Important for SEO

Benefits of Sitemaps

  1. Improved Crawling: Sitemaps help search engines find and index new or updated content faster. This is especially important for large websites, new websites, or websites with many archived pages.
  2. Enhanced Indexing: Sitemaps provide metadata about each URL, improving the chances of your content being correctly indexed.
  3. Better Visibility: They can help ensure all important pages are discovered by search engines, increasing your site's visibility in search results.
  4. Priority and Frequency Information: Sitemaps allow you to specify the importance of each page and how frequently it is updated, helping search engines prioritize crawling.

Potential Drawbacks

  1. Resource Intensive: Large sitemaps can be resource-intensive for both your server and search engines.
  2. Not a Guarantee: While sitemaps can help with indexing, they do not guarantee that all your pages will be indexed.
  3. Potential for Errors: Incorrectly structured sitemaps can lead to errors, potentially harming your SEO efforts.

Step-by-Step Guide to Creating a Sitemap

Step 1: Decide on the Type of Sitemap

Determine whether you need an XML sitemap, an HTML sitemap, or both. XML sitemaps are essential for SEO, while HTML sitemaps can enhance user experience.

Step 2: Create an XML Sitemap

Using WordPress Plugins

If you are using WordPress, plugins like Yoast SEO, All in One SEO Pack, or Google XML Sitemaps can automatically generate an XML sitemap for you.

  1. Install and Activate Yoast SEO:


    • Go to your WordPress dashboard.
    • Navigate to Plugins > Add New.
    • Search for "Yoast SEO" and click "Install Now."
    • Activate the plugin.
  2. Generate the Sitemap:

    • Go to SEO > General in the WordPress dashboard.
    • Click on the "Features" tab.
    • Ensure the "XML Sitemaps" feature is enabled.
    • Click on the question mark icon next to it and then on "See the XML sitemap."

Using Online Sitemap Generators

For non-WordPress sites or other CMS platforms, online tools like XML-Sitemaps.com can be used.

  1. Go to XML-Sitemaps.com:

    • Enter your website URL.
    • Configure any additional settings (optional).
    • Click "Start."
  2. Download Your Sitemap:

    • Once the sitemap is generated, download the XML file.

Step 3: Add the Sitemap to Your Website

  1. Upload the Sitemap:

    • Use an FTP client or your website’s file manager to upload the sitemap.xml file to your website’s root directory (e.g., www.yoursite.com/sitemap.xml).
  2. Update Your Robots.txt File:

    • Add the following line to your robots.txt file to help search engines find your sitemap:
      arduino
      Sitemap: https://www.yoursite.com/sitemap.xml

Step 4: Submit Your Sitemap to Search Engines

Google Search Console

  1. Sign in to Google Search Console:

    • Go to Google Search Console and sign in with your Google account.
  2. Add Your Website:

    • If you haven’t already added your site, click "Add a property" and follow the instructions.
  3. Submit Your Sitemap:

    • Select your website from the dashboard.
    • Navigate to Sitemaps in the left-hand menu.
    • Enter the URL of your sitemap (e.g., sitemap.xml) and click "Submit."

Bing Webmaster Tools

  1. Sign in to Bing Webmaster Tools:

    • Go to Bing Webmaster Tools and sign in with your Microsoft account.
  2. Add Your Website:

    • If you haven’t already added your site, click "Add a site" and follow the instructions.
  3. Submit Your Sitemap:

    • Select your website from the dashboard.
    • Navigate to Sitemaps in the left-hand menu.
    • Enter the URL of your sitemap and click "Submit."

Step 5: Monitor Your Sitemap’s Performance

Regularly check your sitemap’s status in Google Search Console and Bing Webmaster Tools to ensure it is being crawled and indexed properly.

Increasing Your Website’s Ranking with a Sitemap

Optimize Your Sitemap

  1. Prioritize Important Pages: Ensure that your most important pages (those with high traffic or valuable content) are included in your sitemap.
  2. Keep It Updated: Regularly update your sitemap to include new or updated content.
  3. Limit the Number of URLs: If you have more than 50,000 URLs or a file size over 50MB, create multiple sitemaps and use a sitemap index file.

Leverage SEO Best Practices

  1. Quality Content: Regularly publish high-quality, relevant content to keep users engaged and search engines interested.
  2. Keyword Optimization: Use relevant keywords throughout your content, including titles, headers, and meta descriptions, to improve search engine visibility.
  3. Mobile Optimization: Ensure your website is mobile-friendly to cater to the growing number of mobile users.
  4. Fast Loading Speeds: Optimize your website’s loading speed to improve user experience and reduce bounce rates.
  5. Internal Linking: Use internal links to connect related content, helping search engines understand your site's structure and hierarchy.

Monitor and Analyze

  1. Use Analytics Tools: Utilize tools like Google Analytics and Google Search Console to monitor your website’s performance.
  2. Track Rankings: Keep an eye on your keyword rankings to understand how well your content is performing.
  3. Adjust Strategies: Based on your analytics, adjust your content and SEO strategies to improve your site’s performance continually.

Conclusion

Creating and submitting a sitemap is a crucial step in enhancing your website’s SEO and ensuring that your content is indexed by search engines. By following the steps outlined in this guide, you can create an effective sitemap, submit it to major search engines, and optimize your website to improve its ranking. Remember to monitor your sitemap’s performance and make necessary adjustments to maintain and improve your search engine visibility. While sitemaps are powerful tools for SEO, they should be part of a broader, well-rounded SEO strategy that includes high-quality content, keyword optimization, and a focus on user experience.

By integrating these practices, you can achieve better search engine rankings, drive more traffic to your website, and ultimately, achieve your online goals.

Sunday, June 16, 2024

Comprehensive Guide to Credit Cards: Benefits, Harms, and Choosing the Best Bank Credit Card : क्रेडिट कार्ड के बारे में विस्तृत गाइड: लाभ, हानि और सर्वश्रेष्ठ बैंक क्रेडिट कार्ड का चयन

Comprehensive Guide to Credit Cards: Benefits, Harms, and Choosing the Best Bank Credit Card


Introduction

Credit cards have become an integral part of modern financial life, offering convenience, security, and a range of benefits that cater to various needs. However, like any financial tool, they come with their own set of advantages and disadvantages. This comprehensive guide will delve into the details of credit cards, explore their benefits and harms, and help you choose the most profitable credit card from different banks.

Inviting you to be a part of #TeamMetal. Get your OneCard, a Credit Card crafted out of

pure Metal, packed with incredible offers and advanced features controlled by an app. Use my exclusive code KULDEE379 when you join. Cheers! *T&C Apply. Join Now- Link Below 

First Metal Credit Card


Table of Contents

  1. What is a Credit Card?
  2. How Credit Cards Work
  3. Types of Credit Cards
  4. Benefits of Credit Cards
    • Convenience
    • Rewards and Cashback
    • Building Credit History
    • Purchase Protection
    • Emergency Funds
  5. Harms of Credit Cards
    • High-Interest Rates
    • Debt Accumulation
    • Impact on Credit Score
    • Fees and Charges
    • Overspending Risk
  6. Choosing the Right Credit Card
    • Assessing Your Needs
    • Comparing Interest Rates
    • Evaluating Rewards Programs
    • Understanding Fees and Charges
    • Considering Customer Service
  7. Best Bank Credit Cards in 2024
    • SBI Card ELITE
    • HDFC Bank Regalia
    • ICICI Bank Coral Credit Card
    • Axis Bank Select Credit Card
    • Citibank Cashback Credit Card
  8. Conclusion

1. What is a Credit Card?

A credit card is a financial instrument issued by banks or financial institutions that allows you to borrow funds to make purchases or pay for services. Unlike a debit card, which deducts money directly from your bank account, a credit card provides a line of credit that you must repay within a specified period, typically with interest.

2. How Credit Cards Work

Credit cards operate on a simple principle: they allow you to borrow money up to a certain limit (credit limit) and repay it either in full or in part each month. The amount borrowed, if not paid in full, incurs interest. Credit cards also come with billing cycles, and payments are due on a specific date each month.

3. Types of Credit Cards

Credit cards come in various types, each designed to cater to different needs and preferences:

  • Standard Credit Cards: Basic cards with no rewards but lower interest rates.
  • Rewards Credit Cards: Offer points, cashback, or miles for every purchase.
  • Secured Credit Cards: Require a security deposit, ideal for building credit.
  • Balance Transfer Credit Cards: Allow transferring high-interest debt to a lower interest card.
  • Student Credit Cards: Designed for students with lower credit limits and rewards tailored for their needs.

4. Benefits of Credit Cards

Convenience

Credit cards provide unmatched convenience, allowing you to make purchases without carrying cash. They are widely accepted and can be used for online shopping, travel bookings, and in-store purchases.


Hey, I invite you to get India’s best lifetime free Credit Card from IDFC FIRST Bank. Get 2,000 bonus reward points, low APR, interest free ATM cash, up to 10X never expiring rewards plus many more privileges!

Apply now.

IDFC Bank Credit Card


Rewards and Cashback

Many credit cards offer rewards programs that provide points, cashback, or miles for every dollar spent. These rewards can be redeemed for travel, merchandise, statement credits, or gift cards. For example, travel enthusiasts can benefit from miles that can be used for flights and hotel stays.

Building Credit History

Using a credit card responsibly helps build your credit history, which is crucial for securing loans, mortgages, and favorable interest rates. Regular, on-time payments and keeping your credit utilization low positively impact your credit score.

Purchase Protection

Credit cards often come with purchase protection, covering damaged, lost, or stolen items. Some cards also offer extended warranties on purchases, providing additional peace of mind.

Emergency Funds

Credit cards can serve as a financial safety net during emergencies, such as unexpected medical expenses or car repairs. Having a credit card ensures you have access to funds when you need them most.

5. Harms of Credit Cards

High-Interest Rates

Credit cards typically have higher interest rates compared to other forms of credit. If you carry a balance from month to month, the interest can accumulate quickly, leading to substantial debt.

Debt Accumulation

It's easy to fall into the trap of spending beyond your means with a credit card. Without careful budgeting, you can accumulate significant debt, which can take years to pay off.

Impact on Credit Score

Missing payments or maxing out your credit card can negatively impact your credit score. A lower credit score can affect your ability to secure loans, rent apartments, or even get a job.

Fees and Charges

Credit cards come with various fees, including annual fees, late payment fees, foreign transaction fees, and balance transfer fees. These charges can add up, increasing the cost of using a credit card.

Overspending Risk

The convenience of credit cards can lead to overspending. Since you're not using physical cash, it’s easier to lose track of your expenditures, leading to financial strain.

6. Choosing the Right Credit Card

Assessing Your Needs

Identify your spending habits and financial goals. Are you looking for rewards, cashback, or a low-interest rate? Understanding your needs will help you choose the right card.

Comparing Interest Rates

Look for credit cards with competitive interest rates. If you plan to carry a balance, a lower interest rate can save you money in the long run.

Evaluating Rewards Programs

Compare the rewards programs offered by different cards. Consider the type of rewards, the earning potential, and the redemption options to find the best fit for your lifestyle.

Understanding Fees and Charges

Review the fees associated with each credit card. Some cards may offer lucrative rewards but come with high annual fees. Weigh the benefits against the costs to determine the card's overall value.

Considering Customer Service

Good customer service is crucial for resolving issues quickly and efficiently. Research customer reviews and ratings to gauge the quality of service provided by the card issuer.

7. Best Bank Credit Cards in 2024

SBI Card ELITE

Features:

  • Welcome gift worth ₹5,000.
  • 5X rewards on dining, department stores, and grocery purchases.
  • Complimentary airport lounge access.
  • Annual fee: ₹4,999.

Benefits:

  • High reward rate on everyday spending categories.
  • Travel perks including complimentary lounge access.
  • Wide acceptance and strong customer service.

Harms:

  • High annual fee.
  • Rewards redemption may have limitations.

HDFC Bank Regalia

Features:

  • 4 reward points for every ₹150 spent.
  • Complimentary international and domestic airport lounge access.
  • 2.5% fuel surcharge waiver.
  • Annual fee: ₹2,500.

Benefits:

  • Attractive reward points system.
  • Comprehensive travel benefits.
  • Fuel surcharge waiver.

Harms:

  • Annual fee.
  • High interest rate if balance is carried over.

ICICI Bank Coral Credit Card

Features:

  • 2 payback points for every ₹100 spent on retail purchases.
  • 2X rewards on dining, groceries, and entertainment.
  • 1% fuel surcharge waiver.
  • Annual fee: ₹500.

Benefits:

  • Low annual fee.
  • Reward points on essential categories.
  • Fuel surcharge waiver.

Harms:

  • Limited airport lounge access.
  • Reward redemption options may be limited.

Axis Bank Select Credit Card

Features:

  • 10 reward points for every ₹200 spent on dining, entertainment, and travel.
  • Complimentary domestic airport lounge access.
  • 1% fuel surcharge waiver.
  • Annual fee: ₹3,000.

Benefits:

  • High reward rate on key spending categories.
  • Travel benefits including lounge access.
  • Fuel surcharge waiver.

Harms:

  • Annual fee.
  • High interest rate if balance is not paid in full.

Citibank Cashback Credit Card

Features:

  • 5% cashback on movie tickets and utility bill payments.
  • 0.5% cashback on all other purchases.
  • Annual fee: ₹500.

Benefits:

  • Simple and straightforward cashback program.
  • Low annual fee.
  • Useful for everyday spending and bill payments.

Harms:

  • Limited travel benefits.
  • Low cashback rate on non-category purchases.

Conclusion

Credit cards can be a powerful financial tool when used responsibly. They offer convenience, rewards, and the ability to build credit history. However, it's essential to be aware of the potential pitfalls, such as high-interest rates, debt accumulation, and fees. By carefully assessing your needs and comparing different credit card options, you can choose the card that best fits your lifestyle and financial goals.

Whether you prioritize rewards, low interest rates, or travel benefits, there is a credit card out there that can meet your needs. Remember to use your credit card wisely, pay your bills on time, and keep your spending in check to maximize the benefits and minimize the harms.


This guide provides a detailed overview of credit cards, their benefits and harms, and how to choose the best credit card from different banks. With the right knowledge and careful consideration, you can make informed decisions that enhance your financial well-being.